Showing posts with label DotNetNuke. Show all posts

Friday, February 12, 2010

Developing a new module in DNN 5

1. Open the DNN website in VS 2008, right click the website node in solution explorer, add new item, select DotNetNuke module, name your DNN module, add.


2. Do a Project wide search & replace on YourCompany keyword. replace it with your comapny name of choice.


3. Go to App_code folder of DNN website and rename the 'ModuleName' folder by name of your module.

4. Go to web.config, look for  tag inside and add a directory with name of your module (same as in step 3)

5. Go to 'DesktopModules'> 'ModuleName' and rename it, same as in step no 3.

6. Build your website to make sure that everything is OK.

7. Open the DNN website in browser, login into the Host account.


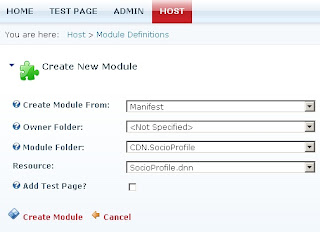
7. Go to Host> Module Definitions> Create New Module> select Create Menu from: Menifest, select your modulename in 'Module Folder' dropdown, Create Module.


8. Switch to VS2008, open '01.00.00.SqlDataProvider' file in DesktopModules> Your-Module-Name-Folder and copy the SQL.

9. Go to website> Host> SQL> Paste the script copied in step 9 here, check the Run as Script checkbox, Execute. It should reply as "The Query completed successfully!".

     You are done with your new module.

    I will continue to blog about how to add features to your module.

    Thursday, February 4, 2010

    Adding a 3rd party module to DotNetNuke portal

    And finally I succeeded to add a 3rd party module Smart-Thinker UserProfile and use it in my DNN portal!

    Here are the footprints:

       1. Download the module extension from Smart-Thinker's portal. Its Free!!
       2. Login into your portal using host account credentials.
       3. Go to Host> Basic Features> Module Definitions> Install Module at the bottom of the page.
       4. A new screen with title 'Install Extension' appears, browse the downloaded module extension and click next. After passing some confirmation screens, you should be able to install the module successfully.
       5. Now when we have installed the module successfully, we are ready to consume it. Naviagate to a page of your choice in your DNN portal, on the top of the page, select Module: 'Smart-Thinker UserProfile Profile', Pane:Content pane, Title: 'Profile', Visibility: Same as page, Insert: Bottom and click 'Add Module to Page'.
       6. Now on the same page, in the content page, a container with title 'Smart-Thinker UserProfile Profile' should appear.
       7. You can customize it by clicking settings icon in the right bottom of this container.

    Saturday, January 30, 2010

    Day 1 with Dot Net Nuke

    1. Register to DotNetNuke and download the latest version of DotNetNuke Community Edition.
    2. Extract it and configure it as a website in IIS. Let’s call it ‘DNN website’. 
    3. Open the DNN website in Visual Studio 2008.
    4. On running it the installation page appears - http://localhost/dotnetnuke/Install/InstallWizard.aspx.
    5. In select installation method, select typical, choose language English, click Next button.
    6. On next page, test permissions of the application, when you pass the sufficient permission test, click next.
    7. On next page you have to configure database connections. Configure your database here.  Click next.  It will complete the installation itself. On page 'Run Database Installation Scripts' in the textbox when you see 'Installation of Database Complete' click next. Also check-out the database you configured in previous page. You will see many tables and stored procedures created by DNN. Click next.
    8. On the next page, 'Configure Host Account' create your SuperAdmin username and password. This username and password you will use to access your website's admin part. Click next.
    9. Next page with title ‘Portal title’, provide host username/password and title to your portal. The host username/password will be used to access all the functionality of the portal. Submit the page and done! We have created our Dot Net Nuke portal.
    10.  
    Problem: #1

          While accessing the DNN portal using IP or DNS (not localhost) it redirects to http://localhost/...

    Solution:

    1. Log in as host account. 
    2. Then go to the Admin > Site Settings page
    3. Advanced Settings> Portal Aliases> add a new Http Alias "domain.com/…"