Tuesday, October 19, 2010

Host WPF Controls in Windows Forms

To host a WPF control or WPF user control (wpfControl in this example) into Windows Form application, create an instance of ElementHost Class and add your WPF control/user control as child to the instance of ElementHost.

using System.Windows.Forms.Integration; 
//Assembly:   WindowsFormsIntegration (in WindowsFormsIntegration.dll)

ElementHost elementHost = new ElementHost();
elementHost.Dock = DockStyle.None;
elementHost.Child = wpfControl;

Now, add the instance of ElementHost to a container control in your windows form (for instance containerPanel here)

containerPanel.Controls.Add(elementHost);

Monday, October 4, 2010

Online WPF Learning Material (Updated)

Save Google from doing it again. I've done it already.

MVVM in WPF
An introduction to the Model-View-ViewModel (MVVM) pattern in WPF

Walkthrough: Getting Started with WPF
WPF's official education library from Microsoft.

WindowsClient.NET
An excellent list of video tutorials useful to beginners and proficient WPF programmers. My personal favorite in WPF video tutorials.

WPFTutorials.NET
Great collection of WPF tutorials including source code examples. Right place to start learning WPF from.

WPF Tutorial
Nice tutorials for beginners including WPF basics, Layout - Panels & Containers, Borders, TypeConverter & MarkupExtensions to XAML, Dependency Property System and Concept Binding.

WPF Tutorial (dotnetslackers.com)
Good resource to start for beginners providing general overview of the key concepts and innovations of WPF.

WPF Wonderland
Collection of adhoc task related articles about  WPF and Silverlight.

Josh Smith's Blog
Expert articles on WPF and Silverlight.

WPF - Beginners tutorial
One page tutorial on basics of WPF.

XAML Basics
Mutlipage introduction to XAML. Useful for WPF and Silverlight beginners.

WPF: A Beginner's Guide (CodeProject.com)
Multipart WPF tutorial series. CodeProject articles rock!

Windows Presentation Foundation (CodeProject.com)
Huge and excellent collection of useful adhoc articles on WPF. Includes a number of sample applications.


WPF Apps With The MVVM Design Pattern
Official content on The Model-View-ViewModel Design Pattern for WPF from MS.


Many more to be explored and to be appended..

Saturday, May 8, 2010

Reset values of all controls using ASP.NET 2.0 and JavaScript

A very common requirement that comes up when building a form with lot of fields is resetting the controls back to their original state. In this article, we will explore how to do this task using both ASP.NET and Javascript. I assume you know how to build web pages in asp.net 2.0. Using ASP.NET
Step 1: Drag and drop a few controls like textboxes, radio buttons, checkboxes etc. on to the form
Step 2:
Add a button to the form and rename its Text property as “Clear all controls using ASP.NET”.  Rename its id property to be “btnClearASP”.
Step 3:
Double click the button. In its click event, call a method that will clear the content of the controls on a Page.
protected void btnClearASP_Click(object sender, EventArgs  e)
    {
        ResetFormControlValues(this);
    }
Write code for this method
C#
private void ResetFormControlValues(Control parent)
    {
        foreach (Control c in parent.Controls)
        {
            if (c.Controls.Count > 0)
            {
                ResetFormControlValues(c);
            }
            else
            {
                switch(c.GetType().ToString())
                {
                    case "System.Web.UI.WebControls.TextBox":
                        ((TextBox)c).Text = "";
                        break;
                    case "System.Web.UI.WebControls.CheckBox":
                        ((CheckBox)c).Checked = false;
                        break;
                    case "System.Web.UI.WebControls.RadioButton":
                        ((RadioButton)c).Checked = false;
                        break;
                 
                }              
            }
        }
    }

Friday, February 12, 2010

Developing a new module in DNN 5

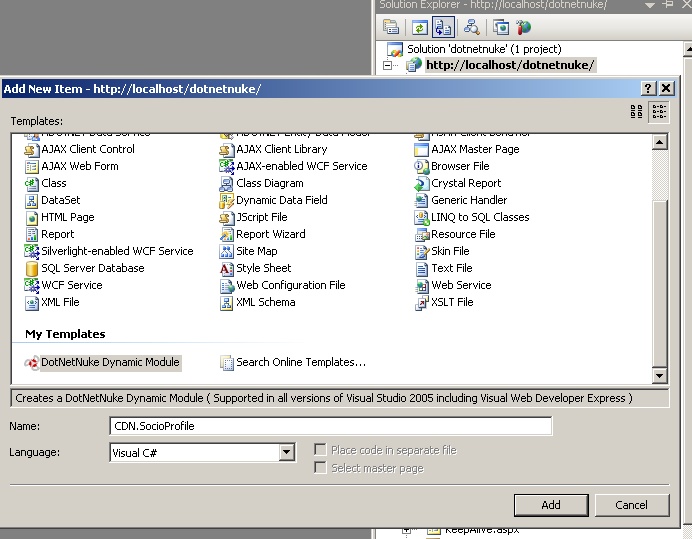
1. Open the DNN website in VS 2008, right click the website node in solution explorer, add new item, select DotNetNuke module, name your DNN module, add.


2. Do a Project wide search & replace on YourCompany keyword. replace it with your comapny name of choice.


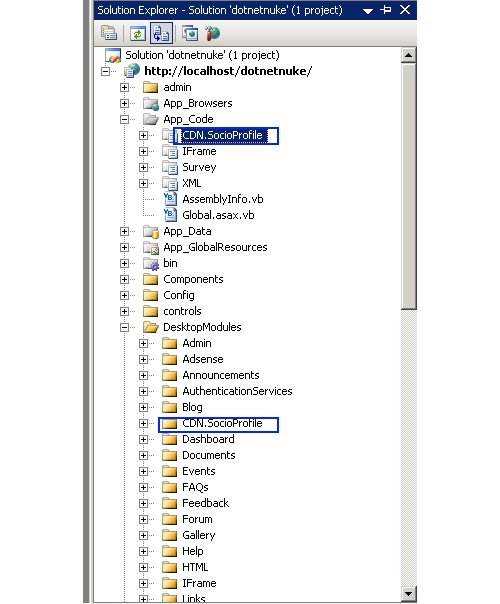
3. Go to App_code folder of DNN website and rename the 'ModuleName' folder by name of your module.

4. Go to web.config, look for  tag inside and add a directory with name of your module (same as in step 3)

5. Go to 'DesktopModules'> 'ModuleName' and rename it, same as in step no 3.

6. Build your website to make sure that everything is OK.

7. Open the DNN website in browser, login into the Host account.


7. Go to Host> Module Definitions> Create New Module> select Create Menu from: Menifest, select your modulename in 'Module Folder' dropdown, Create Module.


8. Switch to VS2008, open '01.00.00.SqlDataProvider' file in DesktopModules> Your-Module-Name-Folder and copy the SQL.

9. Go to website> Host> SQL> Paste the script copied in step 9 here, check the Run as Script checkbox, Execute. It should reply as "The Query completed successfully!".

     You are done with your new module.

    I will continue to blog about how to add features to your module.

    Thursday, February 4, 2010

    Adding a 3rd party module to DotNetNuke portal

    And finally I succeeded to add a 3rd party module Smart-Thinker UserProfile and use it in my DNN portal!

    Here are the footprints:

       1. Download the module extension from Smart-Thinker's portal. Its Free!!
       2. Login into your portal using host account credentials.
       3. Go to Host> Basic Features> Module Definitions> Install Module at the bottom of the page.
       4. A new screen with title 'Install Extension' appears, browse the downloaded module extension and click next. After passing some confirmation screens, you should be able to install the module successfully.
       5. Now when we have installed the module successfully, we are ready to consume it. Naviagate to a page of your choice in your DNN portal, on the top of the page, select Module: 'Smart-Thinker UserProfile Profile', Pane:Content pane, Title: 'Profile', Visibility: Same as page, Insert: Bottom and click 'Add Module to Page'.
       6. Now on the same page, in the content page, a container with title 'Smart-Thinker UserProfile Profile' should appear.
       7. You can customize it by clicking settings icon in the right bottom of this container.

    Saturday, January 30, 2010

    Day 1 with Dot Net Nuke

    1. Register to DotNetNuke and download the latest version of DotNetNuke Community Edition.
    2. Extract it and configure it as a website in IIS. Let’s call it ‘DNN website’. 
    3. Open the DNN website in Visual Studio 2008.
    4. On running it the installation page appears - http://localhost/dotnetnuke/Install/InstallWizard.aspx.
    5. In select installation method, select typical, choose language English, click Next button.
    6. On next page, test permissions of the application, when you pass the sufficient permission test, click next.
    7. On next page you have to configure database connections. Configure your database here.  Click next.  It will complete the installation itself. On page 'Run Database Installation Scripts' in the textbox when you see 'Installation of Database Complete' click next. Also check-out the database you configured in previous page. You will see many tables and stored procedures created by DNN. Click next.
    8. On the next page, 'Configure Host Account' create your SuperAdmin username and password. This username and password you will use to access your website's admin part. Click next.
    9. Next page with title ‘Portal title’, provide host username/password and title to your portal. The host username/password will be used to access all the functionality of the portal. Submit the page and done! We have created our Dot Net Nuke portal.
    10.  
    Problem: #1

          While accessing the DNN portal using IP or DNS (not localhost) it redirects to http://localhost/...

    Solution:

    1. Log in as host account. 
    2. Then go to the Admin > Site Settings page. 
    3. Advanced Settings> Portal Aliases> add a new Http Alias "domain.com/…"

    Wednesday, January 27, 2010

    Microsoft Message Queue MSMQ Part-I

    Microsoft Message Queue MSMQ
    In distributed applications sometimes two applications needs to communicate in an asynchronous manner that is one application shoots a message for another, another application which may not be available at the same time, but could get that message at a later time. This functionality can be achieved by storing the message sent by first application into a central database and then when later application becomes available to process this message, it could receive the message from the database. Let’s look a bit deeper. It is OK to use a central database when you need only two applications to communicate, but how if you have a thousand applications to send messages and only one application to process them?
    For example, you want to accept data from multiple users and you have to do some operations on that data, after that you require writing data to some files. Then in this situation you don’t need the data to be stored in database, you just want to do some operations on that data and copy that to some files. Microsoft Message Queue (MSMQ) fills this need by providing a central location or pool where you can place or remove data. An application can place data in the queue and continue with its business while another application grabs the data when it is ready.

    What is Message Queuing?
    Message queuing is a communication tool that allows applications to reliably interconnect in a distributed environment where one of the applications may or may not be available at any given time. The queue acts as a holding container for messages as they are sent between applications. The applications send messages to and read messages from queues to communicate back and forth. An application writes a message to a queue, which will then be received and processed by another application at some point determined by the receiving application. This type of communication is designed for asynchronous use where the applications involved are not waiting for an immediate response from the other end. The key feature of message queues like MSMQ is the fact that it decouples sender and recipient applications so they do not need to run at the same time. This means that an application can place data in the queue and not deal with whether the item on the queue is delivered to the recipient.
    MSMQ is a part of the Windows Server operating system. Originally MSMQ came with a native, COM-based programming interface. But Microsoft has added a.NET wrapper on top of it which makes the development of MSMQ-based systems quite easier.


    When to Use Message Queue?
    a. Storing insignificant information in the message queue while your database server is busy with other real time processing.
    b. Process user input which is given by the user after getting supporting information from other source or applications that are not active or ready at this stage.
    c. Because of database server outage, you might require keeping user input in the message queue and processing it as and when the database comes online.
    d. Exchanging data with a mainframe system like SAP. Personally, the real time communication with SAP is often a problem. In such cases, the SAP system uses message queue for storing and forwarding information where real time communication is not possible at that time.
    So, in MSMQ there are two concepts – the Message and the Message-Queue
    • Message: The actual message or data to be shared among applications.
    • Message-Queue: The MSMQ message queue that will receive/send messages.

    Types of Message Queues
    • Outgoing: Used to temporarily store messages before they are sent to its destination.
    • Public: Published in the Active Directory. Applications on different servers throughout the network can find and use public queues via Active Directory.
    • Private: These queues are local to a server and are not available to other machines (thus, these queues are not published in Active Directory).
    • System: Contains journal messages (sent from the system), dead messages, and transactional dead-letter messages. Dead messages are undeliverable.

    continued..